2015-11-13

Some further assembly activities...

Last night I spent some time again on the guitar with some further assembly activities.
First of all, I extended the shielding paint from the routed pickup cavities to the top of the body, so that I could more easily connect the cavities' shieldings, pickguard, bridge and control board to ground.
Also, I painted the inside of the hole for the input jack with the shielding paint.

I then mounted the strap buttons:

(I deliberately mounted the front button a bit further down the tip rather than placing it exactly horizontally, hoping to reduce the pull / wear on the button over time, as this way, the direction of force is shifted a bit towards the inside of the body, plus some added friction between the strap and the body once hooked up.)

I then mounted the input jack, just to find out that the jack plate would not sit flush with the body.
Checking the net and my books, I found out that this is normal for Teles, but first of all the jack plate has fairly sharp edges, and frankly I dont like the look.


I then removed the jack again, and using a chisel, I carefully widened the opening of the hole, so that the jack plate would fit better.
Afterwards, I covered the naked wood with some wax and shielding paint again, and mounted the jack back in. (I also used the opportunity and sanded down the jack plate a bit to give it less of a shiny look.)
Now, I like it much better:


2015-11-11

Leveling and crowning the frets

While waiting for the other parts to be engraved, I decided to have a closer look at neck and frets.
Actually, I was hoping to not have to level and recrown the frets as I have never done this before, and as I was hoping that with a new neck, this wouldn't be necessary to start with.
Doing some further reading on this on the internet then told me that you may have uneven frets even with the major players and expensive necks, so that it would be a good idea to at least check them carefully and decide what to do.
... after all, this was one of the reasons why I wanted to build my own guitar, so that I could learn what is to be done - and if anything goes wrong, I would "only" have to buy a new neck...

-----------------------
UPDATE:
Decided to share some links on the internet that describe nicely what needs to be done:

https://diyguitarbuilder.wordpress.com/2014/02/25/fret-levelling-you-take-the-high-cost-road-and-ill-take-the-low-cost-road/

http://www.tdpri.com/forum/tele-technical/201556-fret-leveling-yer-tele-101-a.html

https://www.youtube.com/watch?v=P9kGnvpT5YQ

-----------------------

This is how I went about it, as this was what I found on the net:

1. Making sure the neck is absolutely straight
First, I placed the neck upside down on our kitchen stove, as that has a flat glass top - probably the most straight and even surface in the entire house.

It turns out the neck is slightly bent backwards.
I then adjusted the neck with the truss rod, one small step at a time, until it was as straight as I could measure with a metal ruler.

2. Checking fret heights with a fret rocker
I then checked the heights of the different frets with my home-made "fret rocker" (as I didn't have the actual tool, as you can see, I used a banking card for this).
The idea is to always check cover three frets at a time with the straight edge. If ever you can in any position rock the edge back and forth slightly, this means that the middle fret is higher than the two outer frets.
I then marked all the frets where my banking card indicated a high fret.

It turns out that I found only two or three frets that seemed to be slightly higher than the surrounding ones.
After thinking back and forth, I decided to level the frets anyway, as I also had some scratches and dents from when the neck had initially arrived. After all, I wanted to learn something, and ideally end up with a well set guitar, and when if not now should I do it....

So ahead I go:

 3. Marking all frets with a permanent pen
In order to have good guidance later on on how much I'll be filing away from each fret, I followed advice from the internet and marked all frets black with a Sharpie.

As I was a bit afraid of the metal dust sticking to the fretboard and leaving scratches, I decided to cover off the fretboard with some tape, and to extend the markings on the frets a bit further to the sides:

4. Filing the frets level
I then used a heavy fret leveling file and carefully moved it back and forth on the fretboard, making sure that I would only use it's own weight without any further pressure, and ensuring that I'd always move it back and forth all the way from first to last fret, to get an even level across all frets.

Immediately it became obvious that leveling the frets was a wise decision, as they had very uneven heights as well as uneven settings within every fret, as can easily be seen where the permanent marker has been filed away (this was much more than I had expected after using my fret rocker banking card - seems that that wasn't precise enough for decision-making...):

There were two frets that were sitting really low (one marked in the picture below, visible as the marker is still not removed while other frets have been filed down quite a bit already), so I had to take off quite a bit from the other frets - happy to have this started, as otherwise, the guitar would probably have buzzed quite a bit on this fret...

This is how the fretboard looked once I was done with leveling (on that particular fret, the marker was just barely scraped off finally, which is difficult to see in the picture):

5. Marking all frets again with a marker
In the next step, I used my Sharpie again and marked all frets black again.
The idea is to use the fret crowning file in such a way that once done, a thin black line will remain on the fret, telling me that the level is kept where I had it after the leveling (i.e. ensuring not to file down the top of the fret any further), but with a nice round crown.

6. Using the crowning file to shape the frets
I then used the crowning file and carefully shaped the frets to a nice round crown again.

As I'm not a pro, the remaining marker lines are probably not as thin as they could be, but I hope it will be sufficient anyway. This is how the frets looked after I was done with the crowning:

7. Smoothing and polishing the frets
I then used sand paper / polishing pads to smooth and polish the frets' surfaces.

... starting off with 600 grit sand paper:

... followed by 1500 grit pad:

... then 2400 grit, then 3600 grit:

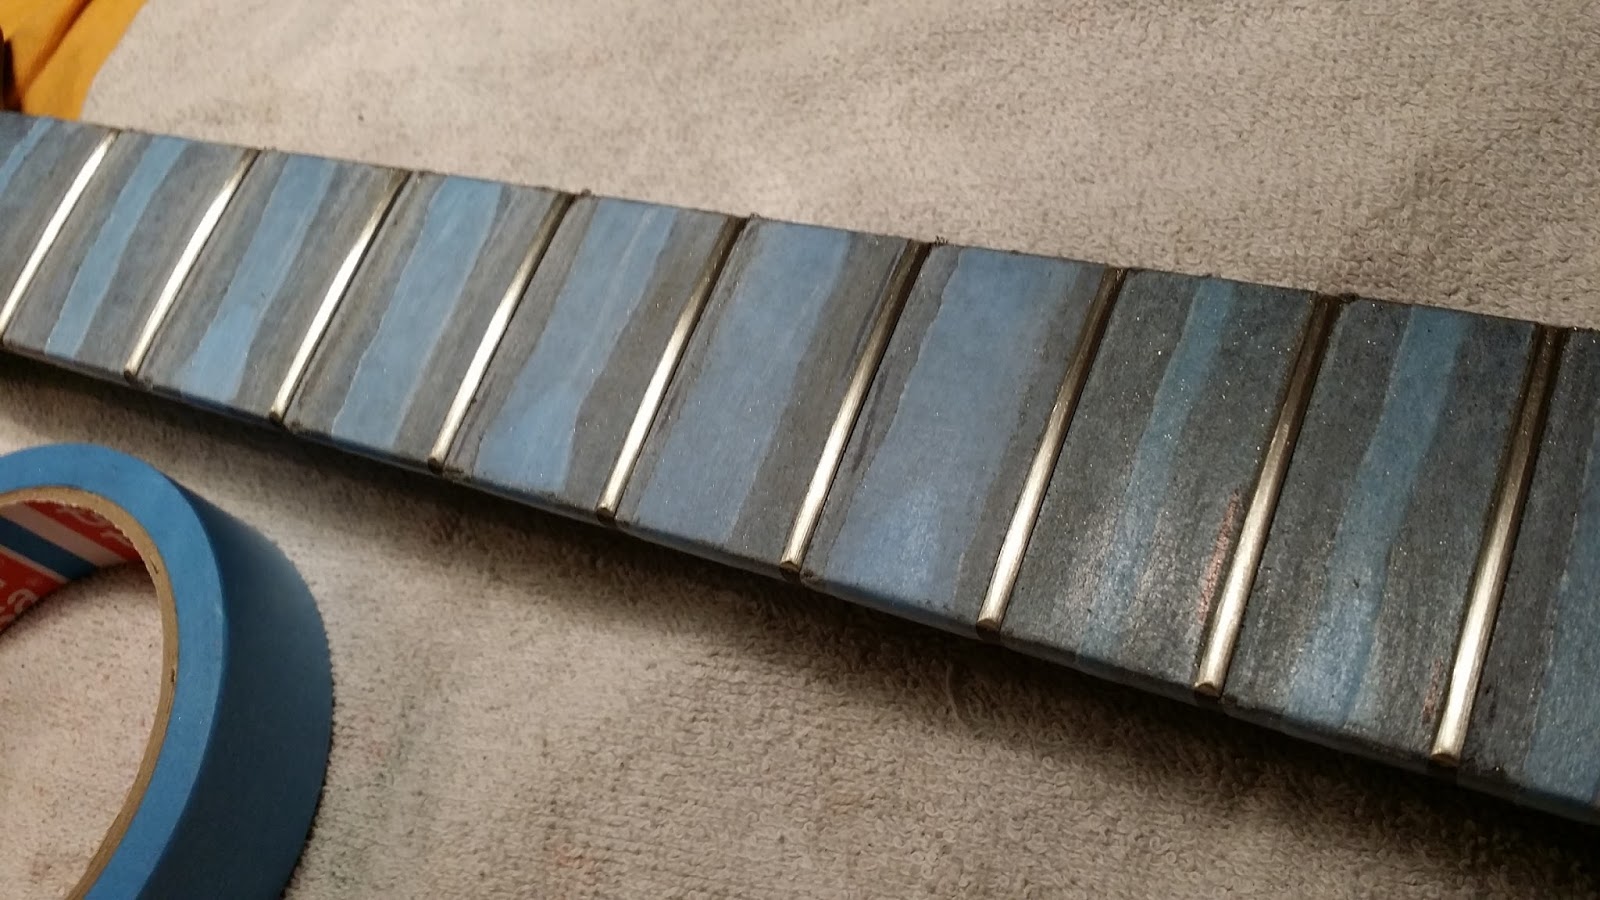
I finished off with 6000 grit. This is how the neck looked afterwards, with the tape still on:

I then took the tape off and rubbed the fretboard off with some lemon oil.
This is the result so far:


I will apply another layer of lemon oil later on for some added protection, but for now, the neck is pretty much done.
Visually, I like the result a lot - let's hope it plays as well as it looks...

2015-11-09

More tests on how to age aluminum...

While I'm waiting for the truss rod plate and headstock plate to be engraved, I'm still trying to find a way how to make them look more like the aged pickguard and control board, i.e. to darken them a bit.

The laser will oxidize the metal, which means that - as it is aluminum - it will become even lighter.
Over the weekend, I have therefore run some further tests with some spare pieces of the same sheet aluminum I used for making the plates.

I tested with oven cleaner, drain cleaner, my self-made oxidizing liquid made from vinegar and steel wool, as well as with salt.

The drain cleaner reacted quite visciously and turned the aluminum a very nice dark color with some uneven stains, but it turned out that this layer would wash off immediately once I rinsed the piece - so this didn't really help.
The oven cleaner left some nice stains, but it didn't really turn the aluminum any darker.
The steel wool vinegar mix left some very dark rusty stains, but most of it got wiped off very easily, and it didn't really yield the result I was looking for.
The salt actually left a nice dull surface, with a slightly darker color. I accentuated this further by rubbing in some of the charcoal color wax that I had used for the guitar body earlier.
Whereas it doesn't show well on the picture (it is actually not quite as dark), this is pretty much what I'm looking for.
I will run some further test to get the best result, but I'll probably go for this approach.

For those of you who want to try the same, this is what I did:
- took a deep dish
- put about a tablespoon of salt into the dish, forming a small pile
- placed the piece of sheet metal on top of that pile
- carefully added water to the level that the piece of metal was well covered
- added another tablespoon of salt on top of the metal, so that it would be covered completely with a layer of moist salt
- I let it sit for about ten hours

Off-topic (sort of) - dropped off pickguard, truss rod cover and headstock plate

During the weekend, I dropped of the pickguard, the truss rod cover, the neck plate and the headstock plate for having them laser engraved (compare my post Styling the plates for engraving).

I really love this guy and his shop - he's a traditional goldsmith, but he's very much open to state of the art technologies. For his jewellery, he started looking into laser engraving some decades ago already, and meanwhile he's offering this as a service to other jewellers, as well as selling the machinery.
It's always a lot of fun talking to this guy, as he is very much open-minded when it comes to discussing project work, with a truck load of experience that he can count on - traditional craftsmenship meeting high tech.
While discussing my guitar project and my ideas on what I'd like to have engraved, we got into a chat about aging materials (as I still need to do that with some of the plates), about 3D printing technology and all sorts of things - how inspiring this was!

So if ever you are in need of some beautifully crafted jewellery, or if you ar ein need of someone who can engrave just about anything into all sorts of metal, be sure to check this guy out:

http://www.atelier-teigelkoetter.de (for his jewellery / goldsmith shop)

(image copyright: Tobias Teigelkötter)

http://www.schmucklaser.com (for his laser engraving technology)

(all images copyright: Tobias Teigelkötter)

Quick update - mounting the string through ferrules

This is just a quick update - I mounted the string through ferrules to the back of the guitar.
They fit very tighly, I had to push them in with a piece of wood and a hammer:


2015-11-06

Making the truss rod cover and headstock plate

Whereas I had an aluminum pickguard and a neckplate from the store, I did not have a suitable (curved) truss rod cover and customized headstock plate, so I needed to make them from aluminum sheet metal.

I first printed the shapes onto a piece of paper, cut them out and glued them on to the metal (there's a thin layer of protective plastic foil on top of the metal to prevent scratches).

I then took a saw, first did a rough cut around so that I wouldn't have to work with the entire sheet, then cut both shapes.

I marked the position for the holes with a sharp pointer, then evened out any sharp edges with a file and continued smoothing the edges with fine grained (600) wet sandpaper.

This is the result once I was done with the sanding:

I then took a hammer and carefully shaped the truss rod cover to match the curve of the headstock.
This is how the plates look now:

I have already called the guy who is supposed to do the laser engraving to check for dimensions and any limitations as well as for required file formats for the designs.

If I find the time tomorrow, I will take the parts to his shop and discuss the details.

Some minor additions...

As I really wanted to make some progress and eventually have the guitar done, I couldn't wait and screwed on the tuners....
After several unsuccessful attempts of aging the spacers that would make the thinner tuners fit into the 10mm predrilled holes (I used oven cleaner, baked linseed oil into the spacers with a flame, used pipe cleaner, all with no success), I heated them to a glowing red with a flame, then dropped them into some cool water. They don't exactly look like what I had in mind initially and turned somewhat blue-ish, but it still looks much better than how they looked in the beginning, all new and shiny.

And now that they are mounted, it doesn't really hit my eye immediately, so I'm fine with the way how they look:


In the next step, I added some shielding paint into the routed cavities for pickups and electronics, as the single coil pickups that I'm planning to use are very prone to collecting disturbances from the surrounding environment:


Once dried, I will add another layer...